Tuesday 12 May 2015

for the attention of Irene

not just Irene, but anyone who would like to know how to make the pop up box card

this is the one from my demo at Bradford on saturday made using the folk owl collection.


score an A4 piece of card at 11.5 cm down the long side, then score from this crease on the slightly longer section at 7, 14, 21 and 28 cm and mark the top smaller section as shown below.


withe the smaller section at the top, cut down the marks to the long crease across and remove the top section of the tab bit as shown.


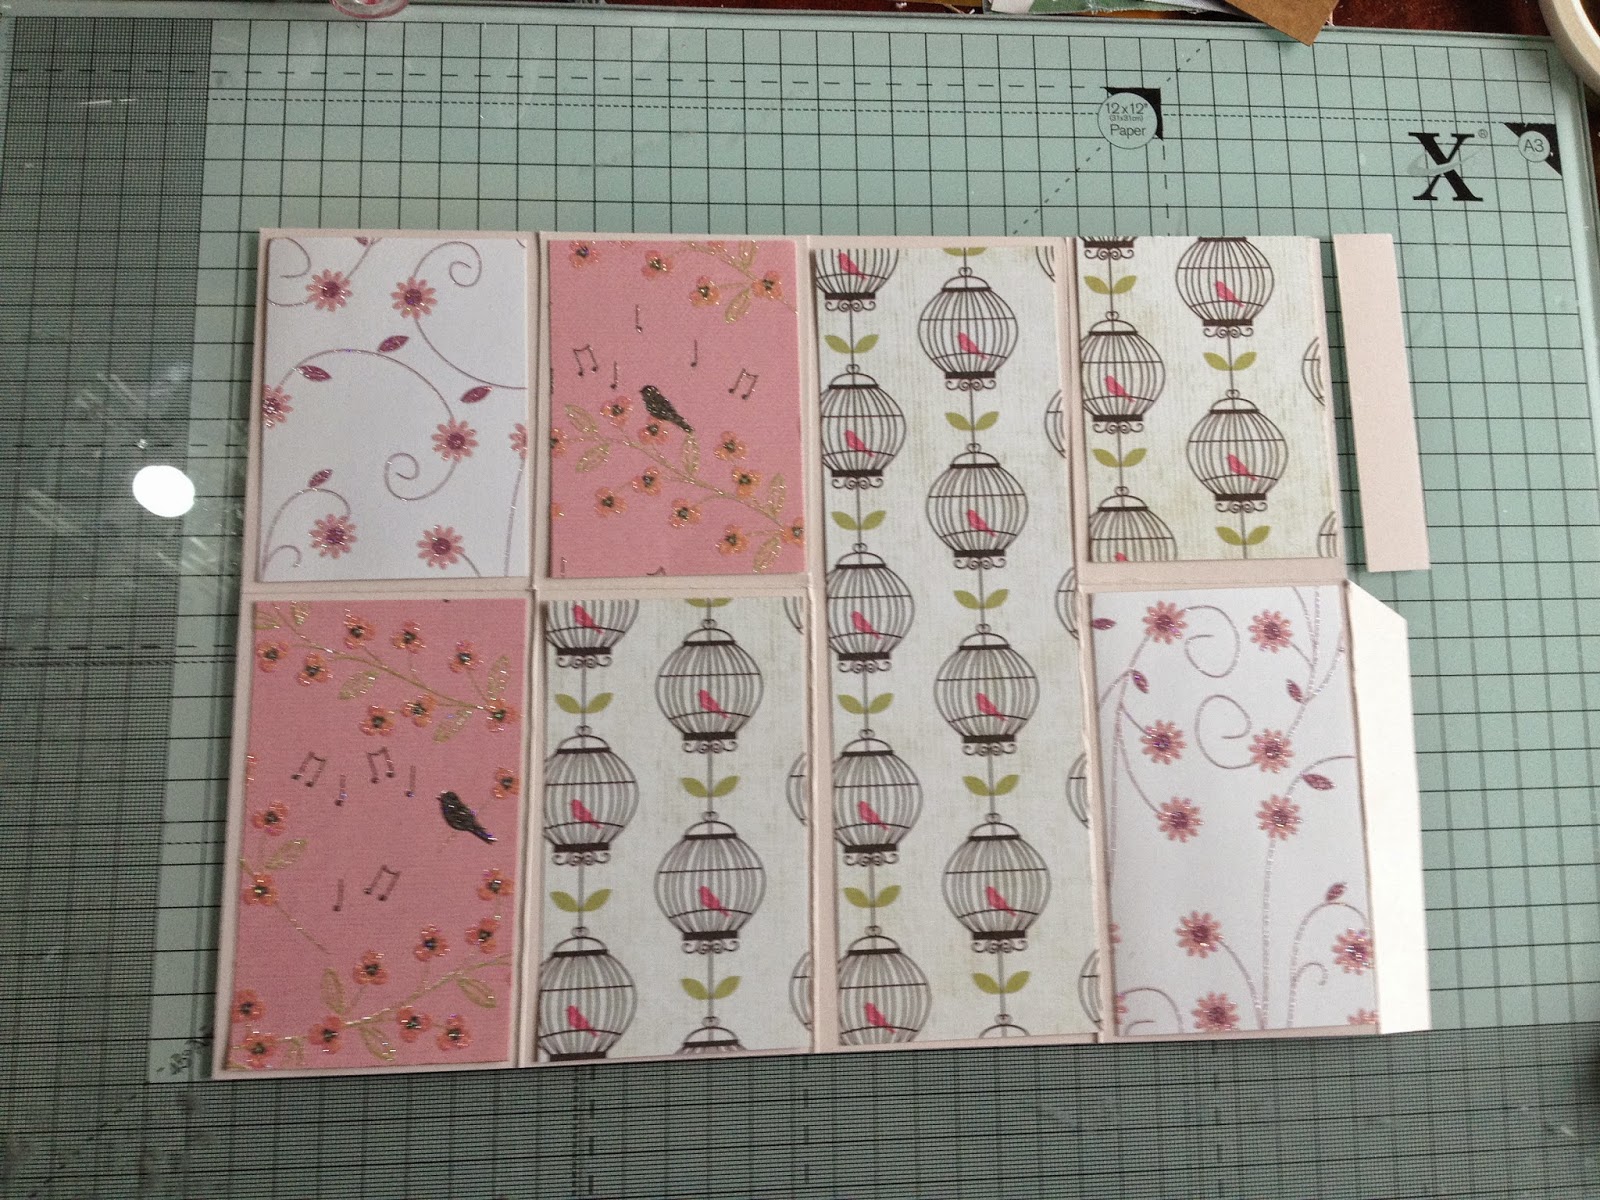
you will need 3 different papers, mine are A - birdcage B - pink and C flowers
so cut A 1 piece 20.3 x 6.  1 piece 11 x 6.5 and 2 at 9 x 6.5
cut B 1 piece 20.3,  1 at  11 x 6.5 and 2 at 9 x 6.5
cut C 3 pieces 11 x 6.5 and 2 at 9 x 6.5

place these papers as shown below making sure your card is the same way as mine, and the 
3 small pieces have to be upside down [ if your papers have a right way up] I purposely chose papers to show this, because when your box is made these 3 pieces fall outwards, and you cant have a bird in a cage falling off his perch 'cos he is upside down! 


next turn your page over so the tab is at the right, and place your papers as shown below. It looks as though you have got it wrong 'cos there are 3 of A card all next to each other, but when finished they will all be right.


fold along the  crease between the 3 short and medium pieces, do not fold the one with the long piece of card - this stays upright.
put double sided strong tape on the tab at the right then fold card in half and adhere,

now cut 3 strips of card 2 cm deep and 9 cm long, fold 1cm at each end making a zig zag shape and adhere to the inside of your box closing the box each time to make sure it folds flat. I did mine in green so you can see them.


next cut 1 cm strips of card to varying lengths and adhere at angles to the inside strips [the green ones]


now decorate as you wish


this is the back of the folded card, so place a tag or some such for writing on at the bottom of the upright section.


I put die cut flowers on the side flaps


a sentiment with a bow on the front,


and hey presto you have your finished pop up box card!!!

hope you like it.


Bradford demo - Mr Mister

the following cards were made using the Mr Mister A4 diecut decoupage set


the card above was made using the template on page 62 of the new Creativity magazine No 58,
to slightly differ mine I punched various circles out of the harlequin paper instead of adding punched circles, "simply the best" was diecut using the new A5 "Dad" dies


the card above is a DL card made using 3 of the smaller toppers, the crossword papers and some orange card from the textured Papermania cardstock, then inside this card ...


I die cut "Dad" from the harlequin paper and "you're the greatest" from black mirri card using the A5 "Dad" words die set


this next card is made using the free gifts with issue 58 of 'Creativity'. I stamped the rosette on red striped paper, the greeting on black and grey harlequin paper, and 'best dad' onto kraft card, put backing paper on my card, a border strip down the right hand side, a topper with a small crossword topper to the right and the rosette to the left, then I cut out the letters 'best dad' and mounted on foam pads and placed bottom left of the card.


the above card was made using an 'Anita's' foiled decoupage sheet. I placed backing paper on the card, ran a piece of kraft card through the new 'morrocan' embossing folder and placed it to the left hand side of my card, then put the topper to the right, I stamped 'dad' using the free gift with the magazine cut out and foam padded onto the bottom right of the card


this is a star card - thought it would be a change, the words have been diecut in black mirri using the 'dad' A5 word die set, then various toppers from the ultimate diecut pack were used to decorate inside, and some brown [very manly I thought] gingham ribbon to tie it with.


this is how it looks when opened out and the details of how to make this are below.


you need 3 pieces of black card 8" x 4" and 4 in blue, also 8" x 4" cut one of the blue ones in half, and fold all the other pieces in half. Stick these folded pieces back to back to form the book shape, then take a long piece of ribbon and adhere centrally to the book from front round the spine to the back, then adhere the "4 x 4" pieces of blue card to cover this up. You now have your "book" to decorate how you wish - change the colours and decorations to anything for a personal gift for someone special.


this card was made from a 6 x 6 blank that was run through the new large spots embossing folder, a strip of orange card was placed at the left hand side of the card, and 2 borders adhered to it. A large decoupaged image was then placed on the card, a tag put across the top right and a winner's cup cut out and put bottom right, then I punched 5 stars from the decoupage sheet with a small round punch and placed on foam pads running down the left of my card


Monday 11 May 2015

demo at Bradford 9th May 2015 - owls


from the folk owl collection

first is a twisted easel card, covered with the owl papers, a large decoupage image on the front, matted onto aqua mirri card, then a sentiment added, and a gem from the pack was placed in each corner, and a bow tied with the ribbon and added under the decoupage image.


for the stopper, I used a small framed sentiment from the A4 ultimate diecut pack.


the next is a zig zag card - I haven't done this one for ages, I had forgotten what fun they are.
both sides are covered with different papers, then 6 tags are taken from the diecut pack, and backed against each other, and adhered to the panels on the card.


this is one side of the card, I decoupaged an image onto the large panel added a gem and buttons  from the bits n bobs pack, then stamped 3 owls coloured and decoupaged them and added to the card.


and this is the other, the tags being back to back mean you see a tag whichever side you look at,
this is the back of the card because the tags have room for a written sentiment, and a decoupage image from the diecut pack was added on the large panel, a few gems and a stamped owl from the urban stamp pack, decoupaged up and cut out and added to the centre panel.


next one is
a card is one from the 6 x 6 card pack with a decoupaged image, matted onto silver mirri card on the front with a border underneath, 2 heart gems on the front and a bow from the co-ordinating ribbons at  the bottom of the panel, then I stamped coloured and decoupaged 2 owls from the urban stamp set, and placed them sitting on top of the panel. At the left of the panel I placed an owl and a feather metal charms onto grey bakers twine and tied in a bow.


and lastly
a 6 x 6 kraft card blank, covered with one of the papers, a panel of kraft card with a centre panel of different paper was placed to the left of the card, then a decoupaged "Love" panel placed to the right, with 2 owls cut from the papers sitting on top.A heart gem was placed in diagonal corners, and at the top of the panel I put a bow from the ribbons with a metal feather charm from the bits n bobs pack.